Category Archives: Cooking For Expats

Cooking For Expats: Mexi-Chicken Casserole

cooking for expatsWelcome back to the Cooking for Expats series on C2C! I’m looking forward to bringing you more budget and “Germany friendly” recipes. Also, don’t forget to check out Emma, from A Bavarian Sojourn, and her “Expat Essentials” series today.

Well, if you can believe it, today I actually have a chicken recipe! Shocking, I know! I initially planned to share vegetable soup, but I made this last night and it turned out SO GOOD. This is an excellent “expat recipe” because it’s another that calls for condensed cream soup that I made myself. I have made versions of this before, but this one turned out the best by far. It’s pretty versatile, so throughout you’ll see where you can use other options. Also, don’t let it scare you that it has a few steps. It’s really very easy and you can do the cream soup ahead of time to make it easier. You would just need to add a little milk or chicken broth later if it’s too thick. I also cook the chicken in the slow cooker because it makes for more flavorful tender chicken. Again, not necessary if you have a preferred method. You can also add green chiles when cooking the chicken or jalapenos to the casserole before cooking if you like it spicy. We would, but alas, not good for the boy. We clearly need to divide our meals in half for his portion and our spicy portions!

Make sure to read all the way through when preparing for this as the ingredients are listed for the total needed but used at different times in different amounts.

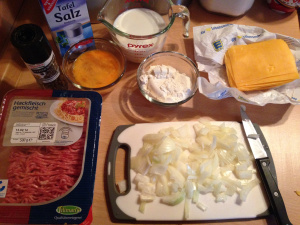
  • 1 diced green bell peppermexichicken casserole
  • 1 diced yellow onion
  • 1-2 TBS taco seasoning mix (I used about 1/3 of a seasoning packet)
  • 300ml (plus another 3/4 cup to be used later)  chicken broth
  • 1 can diced tomatoes with juice
  • 50g unsalted butter
  • 1/4 cup flour
  • 1 1/4  cups of milk
  • shredded cheddar cheese (or cheese of your preference - I used the light Reibkase)
  • 100g sour cream
  • 450g cooked shredded chicken
  • tortilla chips
  • salt and pepper

1. Place cleaned chicken breasts, bell pepper, onion, taco seasoning, tomatoes, 300ml chicken broth in slow cooker for 4-5 hours on low. Stir every so often. When done, pour contents into a colander to strain out liquid. Let chicken cool so you can shred. Shred and set aside in a medium-sized bowl including the tomatoes, onions and bell peppers.

2. Preheat oven to 350F/178C. Lightly spray casserole dish with cooking spray.

3. Melt butter over medium heat.

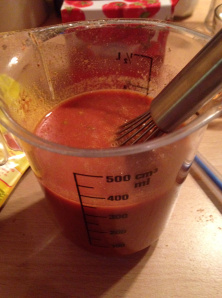
4. Whisk in flour until smooth. Add 3/4 cup milk and 3/4 cup chicken brother. Stir until thickens. Add salt/pepper to taste. (I only added pepper).

5. Pour sauce into chicken mixture. Add remaining 1/2 cup of milk and sour cream. Mix well. You may add more taco seasoning or even just cumin at this point if you prefer. I didn’t because my husband doesn’t really like the strong flavor. *gasp*

6. Layer the bottom of casserole dish with crushed tortilla chips. Pour half of chicken mixture over chips and spread evenly. Add another layer of crushed chips and cover with remaining chicken mixture. Sprinkle the top with cheese.

7. Cover and bake for 25-30 minutes. I have a top-only heat,old sucky oven, so I ended up having to uncover and bake until the cheese browned on top which I think turned out better.

8. You can serve with shredded lettuce and diced tomatoes (optional).

Please let me know what you think and feel free to suggest ideas for recipes or ask any questions you may have! I hope you enjoy and if you make it, come back and tell me!

*recipe adapted from Key Ingredient

Top Mommy Blogs - Mom Blog Directory

Cooking For Expats: Cheeseburger Pie

cooking for expatsWelcome back to the Cooking for Expats series on C2C! I’m looking forward to bringing you more budget and “Germany friendly” recipes. Also, don’t forget to check out Emma, from A Bavarian Sojourn, and her “Expat Essentials” series today.

So, I realize I’m pushing the ground beef and that’s not intentional. It’s simply that I won’t share a recipe here until I’m comfortable with it and my pork and chicken recipes are okay, but nothing I’m ready to share yet. I do hope to share some yummy vegetable soup next time!

Ok, so let me get on with this week’s recipe for Cheeseburger Pie. I had never eaten this or heard of this before until a sweet friend brought it over for us after we had our son. M loved it! I have been wanting to make it for him, but the recipe calls for Bisquick which as far as I know, I can’t buy here. I have found a recipe to make your Bisquick, which you can find on my Pinterest, but until then, I followed a recipe from South Your Mouth as it only called for flour. (She has awesome recipes that always turn out good, so definitely check her out!) Her recipe also calls for Lipton Onion Soup Mix, which I also haven’t found, so I went on winging it as usual. I adapted her recipe a little more, using what I had on hand (no dry mustard and I used regular cheddar) and it still turned out so yummy! This dish is also toddler-friendly and definitely approved by my husband and son!

  • 1 Tbs oilrecipe ingredients
  • 1 diced yellow onion
  • 1/2 cup flour
  • 1 cup milk
  • 200g cheddar cheese (or cheese of your preference)
  • 450g ground beef (hackfleisch gemischt)
  • 2 eggs
  • salt and pepper

  1. Heat oil in medium-sized skillet. Once oil is hot, add the onions and saute for 2-3 minutes.
  2. Add ground beef, sprinkle salt and pepper to season the meat. ( I always add paprika to help give a little spice to the meat without being too much for the boy. It seems to make a difference.)
  3. Brown the meat and drain fat, set aside.
  4. In a medium bowl, add your flour and slowly whisk in the milk. Once well combined, add the eggs.
  5. Spray a 9-inch pie plate with cooking spray.
  6. Scoop some of the meat into the pie dish and spread evenly. Then add layer of cheese (I had slices, but shredded would obviously be better). Alternate until done, ending with a layer of cheese on top.
  7. Pour egg, milk and flour mixture evenly over the top of the pie.
  8. Bake at 375F (180C) for 30-40 minutes until cheese is brown and bubbly.
  9. Let sit for about 10 minutes before slicing.
  10. Be creative and add lettuce, tomato, pickles or other garnishes!

Please let me know what you think and feel free to suggest ideas for recipes or ask any questions you may have! I hope you enjoy and if you make it, come back and tell me!

Top Mommy Blogs - Mom Blog Directory

Cooking For Expats: Ground Beef Stroganoff

cooking for expatsWelcome back to the Cooking for Expats series on C2C! I’m so glad you enjoyed the first segment last week and I’m looking forward to bringing you more budget and “Germany friendly” recipes. Also, Emma, from A Bavarian Sojourn, reached out to me last week as she is also going to be starting her “Expat Essentials” series today. We are contemplating a way to work together to make this even better for you guys! As she is an expat from the UK in Germany and I an American in Germany, we have hopes that this could be a great partnership.

If you have any ideas or anything you’d like to see, please share them with us!

stroganoff pinOk, so let me get on with this week’s recipe for Ground Beef Stroganoff. Let me just say again that I am by no means a culinary extraordinaire. I am simply taking “American” recipes and attempting to find or substitute the ingredients needed to make them here in Germany AND do it on a budget. This was my second time making this dish and my husband loved it so much that he asked me to make it again, even after eating leftovers the second day. This dish is also toddler-friendly and approved. My son loved it! And I should also mention that there is no “cream of” anything in this as is usually called for. As you know, you can’t buy condensed cream soups here in Germany; at least not that I have been able to find. But, in all honesty, this tastes better, eliminates the salt and preservatives from the cream soup, and the items you need to substitute are ones you typically have on hand (flour, butter).

  • 2 Tbs oil
  • 1 small diced yellow onion
  • 250g mushrooms (1/4 cup diced and the rest sliced)
  • 50g butter
  • 1/4 cup flour
  • 3/4 cup milk
  • 1/2 liter beef broth (fleisch brühe)
  • 200g sour cream (sauer rahm)
  • 450g ground beef (hackfleisch gemischt)
  • 500g pasta (typically egg noodles, I used fusilli as I find it grabs the sauce better and easier for my kiddo)
  • salt and pepper
  • garlic clove - optional (I omitted because M hates garlic)

  1. Prepare beef broth if using the cubes and set aside.
  2. Heat the oil in a medium-sized skillet over medium-high heat.
  3. Add sliced mushrooms and onions (as well as garlic if using). Saute for about 5 minutes.
  4. While you saute the onions and mushrooms, melt the butter over medium heat in a saucepan.
  5. Add ground beef to mushrooms and onions and lightly season with salt and pepper. Continue browning meat while making the sauce. The meat can be chopped finely or left in large pieces based on preference. Once the meat is cooked through, turn the heat on low to medium low depending on your stove top. The idea is to keep it warm while slowly carmelizing the onions.  Occasionally stir and continue to watch as you cook the sauce.
  6. When butter has melted, add the diced mushrooms and saute until tender. (about 5-10 minutes)
  7. Add flour to butter/mushrooms and whisk. If it’s too thick, you will need to add more butter. It needs to be a thick liquid (see photo above).
  8. Whisk milk into flour mixture and increase heat to medium high.
  9. Whisk in 1 1/2 cups of beef broth. Keep the remaining broth for reserve as you can add this to your sauce if it starts to get too thick.
  10. Bring sauce to a low boil, continuing to stir as sauce should start to thicken. If you’re noticing that the sauce is not thickening, add flour 1 Tbs at a time.
  11. Begin boiling water and cook pasta.
  12. Once sauce starts to thicken, add your meat mixture making sure to scrape the onions and leftovers from the pan. Stir well and let cook on medium low for about 15 minutes. May need to add additional salt/pepper to taste.
  13. Pour sauce over pasta!

Please let me know what you think and feel free to suggest ideas for recipes or ask any questions you may have! I hope you enjoy and if you make it, come back and tell me!


*Recipe adapted from The Country Cook and The Foodie Army Wife.

Top Mommy Blogs - Mom Blog Directory

Cooking For Expats: Bolognese Sauce

cooking for expatsWelcome to a new series here on C2C! As I am getting more settled in my new home, I am rekindling my love for cooking. I have to admit, it has been really hard trying to improvise, find substitutions and convert measurements and temperatures in attempts to make “American” recipes here in Germany. I have had some help in this regard from Connie at FoodEssen, a lovely site you should also check out. To make this even a bit more difficult, we are a single income family so I also try to make things as budget friendly as possible.

That all being said, I thought I would share some of my “creations”  here with you. I am in no way claiming culinary perfection or creativity here, but thought these ideas might help someone else in my shoes. I know I searched high and low for things like this when I got here, not knowing even the basic of things. And while yes, I have a German husband, he works long hours and this responsibility is mine to learn. My biggest problem in sharing these with you is that I often don’t measure ingredients, but cook by taste. I will do my best to nail down measurements in hopes that you enjoy these recipes as much as we do!

So, for this week, we will start with the basic of the basic: Bolognese Sauce. I have Italian heritage and let me tell you, I have been working on perfecting my homemade sauce for years…..and then I moved here AND got put on a strict budget. Here is a German-shopping, budget-friendly recipe.

INGREDIENTS

1 TBS EVOO (we use Sunflower oil, but olive oil is best)tomato, onion, mix

1 small yellow onion

300ml hot water

500g Tomaten Passiert (tomato puree)

400-500g ground beef (a pound is about 450g - we actually use “Hackfleisch gemischt” which is a mix of pork and beef so it’s a bit less fat)

2 packages of Knorr or Maggi Quick Fix Spaghetti Bolognese

Salt & pepper

DIRECTIONS

  1. Heat oil in medium-large pot over medium high heat.
  2. Finely dice onion and saute for about 5 minutes.
  3. Add meat and lightly season with salt and pepper. Brown meat and “chop” into small pieces. You can leave them larger if you like, but I like the meat ground pretty fine.
  4. While meat is cooking, measure out 300ml of hot water and whisk in both seasoning packets.  photo 2
  5. Once the meat is done, drain and rinse if you prefer. This particular meat doesn’t leave much to drain so I don’t, but I know many prefer to do so.
  6. If you have drained the meat, put back in the pot and add the water mixture keeping the heat on medium high.
  7. Then immediately add the tomato puree.
  8. Stir together well and bring back to a low boil.
  9. Turn down heat to low and let cook for a minimum of 20 minutes. I let mine cook for a minimum of one hour. I think cooking it that long really allows the flavors to come together with the meat being more tender and seasoned. But, this is optional.
  10. Taste after about 15 minutes to see if you like the flavor. Add more tomato puree/water to have thinner sauce. You can also add a can of diced tomatoes or fresh tomatoes if you like them in your sauce.
  11. Depending on how long you cook your sauce, start your making your pasta about 20 minutes before your are ready to eat.

bolognese sauce

This sauce is thick and usually has enough leftovers for lunch the next day. I would also add some crushed red pepper if you like more spice to it, but I typically don’t since that would be too much for my son.

Hope you enjoy it! If you make it, come back and let me know what you think! Or, if you have ideas for additions or changes, let me know!


Pumpkin Bread Without the Can

Well, hello there! Why yes, it looks like I am still alive and possibly feeling better {dare I jinx it}. My head is still in a cloud, full of cold medicine, so be patient with me and possibly my poor writing skills.

Before I got this plague cold, I embarked on finally making my favorite pumpkin bread with fresh pumpkin! For us expats, we have to learn to adapt and in Germany, they don’t sell canned pumpkin. So what’s a girl to do? Figure out how to make it anyway!

Years ago, I found this recipe and it has never let me down. It is always moist with a perfect chewy crust on the outside. It has a perfect spice to it and the recipe makes a lot! I have made both bread loaves and muffins for gifts from this recipe and always received rave reviews. The bread tastes better the second day making it even more perfect for holiday gift giving!

But first, if you are without the luxury of canned pumpkin, you have to make your puree. I found this recipe, courtesy of Pinterest and it worked out great. I would suggest possibly making the puree the day before only because it can get a bit time consuming. I used these four pie pumpkins which gave me enough for the recipe and an equal amount to freeze for next time {or pumpkin pie}.

As you can see from the photo, there is one pumpkin that looks more “normal”, like the ones we are used to in the states, but all were listed as Kürbis (pumpkin). The three that look the same I bought at Aldi and I was actually more pleased with their results. They were more moist and did not require any added water to make the puree while the other was quite dry. However, the seeds seemed different so if you are also wanting to roast seeds, I would recommend buying the pumpkin that looks “normal”.

To Make the Puree:

  • Preheat the oven to 350F (180C)
  • Cut off the top of the pumpkin and then cut in quarters.

  • Remove all the seeds and place quarters in a baking dish ( I used a baking sheet lined with baking paper).

  • Bake the pumpkins for about 45-60 minutes until you can pierce through the flesh and skin with a fork.

  • Let the pumpkin cool and then peel off the skin. The quarters make it easy for you to cup in your hand while scooping out.
  • Place the pumpkin in a food processor or blender {I used my fabulous Vitamix that I love so much I that we have a transformer so I can use it here with the different power voltage)

It had to make an appearance….did I mention I LOVE this thing?

  • As you blend, add water a teaspoon at a time, to reach the puree consistency. The first batch I made, I used the “normal” guy and one of the other pumpkins. I needed 3.5 teaspoons of water. However, the other two pumpkins did not require any added water. **Just be careful to add it slowly as you don’t want it watery.**

It’s not the usual brown color like the can, but it smells so good and it’s fresh!

Then I just proceeded to follow the bread recipe from allrecipes.com as usual.

INGREDIENTS:

1 (15 ounce) can pumpkin puree

4 eggs

1 cup vegetable oil

2/3 cup water

3 cups white sugar

3 1/2 cups all-purpose flour

2 teaspoons baking soda

1 1/2 teaspoons salt

1 teaspoon ground cinnamon (Zimt)

1 teaspoon ground nutmeg (Muskatnuss)

1/2 teaspoon ground cloves (Nelken)

1/4 teaspoon ground ginger (Ingwer)

*The German word has been placed in parenthesis for the spices. Also make sure the spice is labeled “gemahlen” for “ground”. 

DIRECTIONS:

1. Preheat oven to 350 degrees F (175 degrees C). Grease and flour three 7×3 inch loaf pans.

2. In a large bowl, mix together pumpkin puree, eggs, oil, water and sugar until well blended. In a separate bowl, whisk together the flour, baking soda, salt, cinnamon, nutmeg, cloves and ginger. Stir the dry ingredients into the pumpkin mixture until just blended. Pour into the prepared pans.

3. Bake for about 50 minutes in the preheated oven. Loaves are done when toothpick inserted in center comes out clean.

It turned out mostly perfect! The only difference is that the cloves were too prominent. Here in Germany, they sell ground cloves in a jar like usual but when opened they are in little packets. This obviously keeps the spice very fresh, but for me, a bit overpowering. 

M suggested adding some whipped cream or ice cream when eating it to smooth it out, but next time, I will just use less. I gave a loaf to my mother-in-law who had never had it before and she loved it just as is!

Hope you love it as much as I do! If you make it, let me know how it turns out!